Starting the year off correctly with one of my favourite
things I’ve ever made! This cinnamon star bread is delicious and super impressive and once you’ve cracked
the dough-making, it’s a fairly easy process!
This is the same recipe as my individual kanelbullar but
with a different assembly at the end which just turns it into a show stopper. This would
make a great centrepiece dessert, sliced up and served with a dollop of ice-cream or
custard.
Serves 8, realistically. But you will find no judgement here if you keep it all to yourself.
Some tips:
- It is really easy to overheat the milk and butter mixture at the start, so I reserve about 60ml of cold milk and add it after heating to quickly bring the temperature down.
- Making a miniature yeast “slurry” with some of the milk mixture and a little sugar boosts the rising. Too much sugar kills yeast, but a little will help feed it.
- A round baking tray makes this a lot easier – for example a pizza tray. Bonus – these are cheap and easy to find
- It’s fine if you don’t roll out perfect circles (I never do), everything kind of comes together ok in the oven.
- Cutting into strips is easiest if you cut into quarters and then cut each quarter again twice to get four strips per quarter, so 16 strips total.
Ingredients for dough
- 50g butter
- 160ml milk
- 2 tsp dried yeast
- ¼ tsp salt
- 50g sugar
- 375g plain flour
Ingredients for
filling and finishing
- 90g butter
- 50g granulated sugar
- 25g granulated brown sugar
- 2 tbsp vanilla sugar
- 1 tbsp cinnamon
- 1 egg, lightly beaten
- Optional topping – Coarse brown sugar, pearl sugar, or crushed sugar cubes
Method
Begin with the dough. Melt the butter over a low heat in a
saucepan, and add the milk. Heat until approx 45 degrees Celsius for dry yeast.
Make a little yeast slurry to enhance the rise. Add half the
yeast to a bowl, pour in 3 tbsp of the butter/milk mix and 1 tsp of sugar and
set aside for 15 minutes.
Add the flour to a large bowl with the salt, sugar and remaining yeast and mix well,
making a well in the middle. Pour in the rest of the milk mixture and the
yeasty mixture. Mix to combine, initially with
a spoon, then bring together with your hands and kneed the dough for
approx 10 minutes.
Cover and let rise for about an hour in a warm place, until
approximately doubled in size.
Just before getting ready to work with the dough again,
combine the ingredients for the filling: the butter, sugars and cinnamon.
This is where the recipe begins to differ from the original
kanelbullar recipe.
When risen, divide the dough into four equal pieces.
Roll one out into approx. 35cm round circles, place on a
round baking tray covered in greaseproof paper.
Spread with 1/3 of the cinnamon filling, leaving about 1 cm clear at the edges.
Rub a little water around the edge that you’ve left clear of
the filling.
Roll out the next dough ball the same, put on top of the
bottom one and press gently around the edges to seal to the lower layer. Repeat
the process as above with the remaining dough layers, leaving the top layer
plain, without any filling on top.
Place a cookie cutter in the centre (about 7-10cm wide) and
use this as a centre guide.
 |
| You can see that my dough is very much not circular - but it still turns out great! |
Cut into 16 equal strips from the cookie cutter to the edge.
 |
| Still need to make a few more cuts but that's the start! |
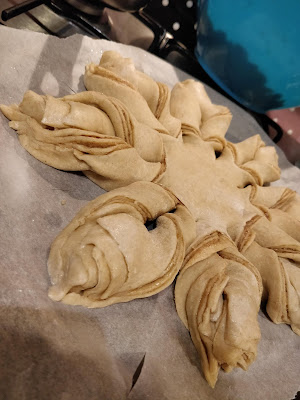
Twist two adjacent strips away from each other, twice.
 |
| That's one twist. Needs one more |
Pinch the edges together.
Repeat 7 more times, so all the strips are paired, twisted
and sealed. Remove the cookie cutter.
Allow to rise for about an hour, covered, in a warm kitchen. Near the end of rising time preheat the oven to 190 degrees C.
 |
| Looking a lot more puffy |
Brush with beaten egg.
...and, if preferred, sprinkle over some coarse brown sugar, or pearl sugar, or crushed sugar cubes.
Bake in the oven for 12-15 minutes until golden brown and
absolutely gorgeous. Allow to cool on the baking tray.


No comments:
Post a Comment